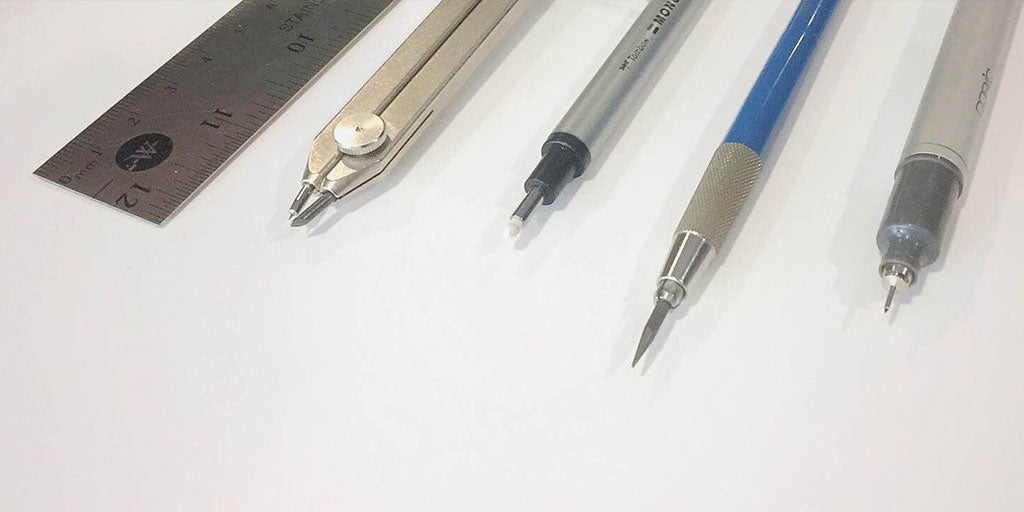
Getting into hand-lettering can be intimidating. Where do I start? What tools do I need? How do I start making awesome looking letters?? Even though you can hand letter with any old pencil and eraser, it helps to have a good set of tools. And the great thing about hand lettering, is that the basic tools are very simple and easy to find! Here’s a simple introduction to 6 essential tools to help you get started.
Pencil/Lead Holder
The first and most important tool in your toolkit. A good pencil can make or break your lettering process. I've found that a lead holder gives a better experience over a conventional pencil. This is because it sharpens better and stays sharp longer. When you are just getting started, you will want to experiment -- so having an easily erasable lead will make a big difference. I use a 2H lead as it's easy to erase and allows room to make mistakes. The key is to draw softly. This will ensure you can erase to your hearts content, without leaving any marks or depressions in the paper.

Tip: Before your lead hits the paper, try creating a rough sketch of the basic layout of words/letters. This will save you lots of time (and erasing!).
Erasers
I was a bit overwhelmed the first time I went to the art store to pick up an eraser. There were so many to choose from! I've tried a good number of them, but have found the simple white eraser to be the most effective. I usually use this to erase large portions of pencil, or over the entire piece once ink has fully dried. The eraser pen, however, is what I can consider to be my secret weapon! This is basically a white eraser loaded into a pen-shaped holder. It is wonderful for precision erasing. I find this especially helpful just after I've inked and I want to erase specific areas without worrying about any smudging. This pair of quality erasers will take you a long way!

Tip: Wait at least an hour after inking before erasing pencil lines. Otherwise you run the risk of smudging your beautiful creation!
Good quality paper
There is a school of thought that says you should use cheap printer paper for lettering. The idea is that you can experiment more and not worry about cost. If that works for you, I say go for it! However, I've personally found that having good quality paper makes a huge difference. It erases better, holds ink better, smudges less, and inspires excellence when I'm putting pencil or pen to paper. I've lettered on all types of paper, but find that something close to 145lb Bristol works the best.

Tip: you can buy Bristol in tearaway sheets that make it easier to draw on or cut down to smaller sizes, without worrying about the fold of a sketchbook.
Ruler
A good ruler is an essential part in any lettering project. Drawing light pencil guides with a ruler is usually the first part of the process. This helps establish straight lines for the tops and bottoms of each word/phrase, as well as spacing between each line. Abraham Lincoln famously said that if he had six hours to cut down a tree, he would spend the first four sharpening the axe. The same principle applies to laying down proper guides before you start your lettering project. If you spend time up front laying down good guides, the lettering will be that much easier.

Compass
A handy tool that opens up all sorts of possibilities. If you want to introduce any curved lines into your lettering project, a compass is essential. I tried all sorts of things before using a compass (using cups, bowls and plates: no joke!), and nothing came close to the ease and precision that a compass gives.

Tip: Place your ruler across your paper, mark the middle points, and draw a line down the middle. This will serve as a guide for your letters, and also provide a good spot to place your compass.
Ink Pen
By far, my favourite part in the lettering process is inking. All the hard work of sketching, erasing and fine-tuning has been done. The only thing left is to ink your creation with diligence and care, and step back to admire your masterpiece (or see more clearly all your mistakes!). This is the time to put on some good music and just enjoy the process. There are lots of pens to choose from, but I’ve found the Copic Multiliner 0.1 to be the best tool for the job. You can also buy a few larger sizes if you have large areas to ink.

Tip: Do the outlines first and then fill in the letters after. You can also go back over the lines with 0.1 or smaller to correct wavy edges.


So there you have it, six tools to get you started in your hand lettering journey! All said and done, filling your toolbox with these items will only set you back $30-40 or so. It’s a pretty small investment to explore the amazing world of hand lettering. And if you find you love it (which I’m sure you will!)–you can always add to your toolbox to expand your possibilities.


1 comment
Teresa Van Norman
Dear Jason and Laura,
I loved Your blog post on hand lettering. I was wondering if You could tell me the brands of the tools You use.
I am an artist as well getting ready to start my own buisness and I’ve been struggling with using up the ink/nib in the pen brand I’ve been using.
Do You have any recommendations?
I love Your art! It’s absolutely beautiful!
-Teresa
Leave a comment
All comments are moderated before being published.
This site is protected by hCaptcha and the hCaptcha Privacy Policy and Terms of Service apply.